Vampire Survivors: Complete Guide to Crafting, Evolutions, All Weapons & Beginner Builds
In Vampire Survivors, the gap between new players who get stuck at the 30-minute mark and players who can consistently beat runs and get all rewards isn't about fast clicking or luck—it's about whether you've mastered the rules of evolving recipes. Early on, this game feels like "grab whatever you find," but after a few runs, you'll quickly see the core: base weapons are just half-finished. What lets you stabilize around the 10-minute mark, start clearing hordes like they're grass at 20 minutes, and stay totally calm before 30 minutes are almost always evolved weapons, combined weapons, and a small number of special evolutions that need strict conditions. Recent player guides put it simply: Evolutions are the biggest power spike in this game, and common evolving conditions are maxing out a weapon and carrying the matching passive item; once those are met, you have a chance to get an evolved weapon by opening a chest.
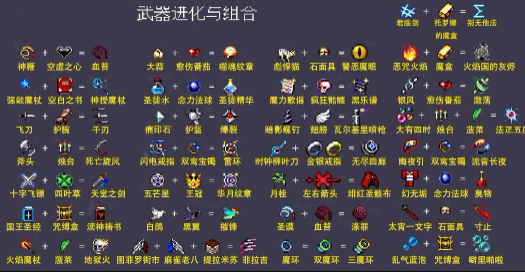
I. Introduction: Vampire Survivors Evolving Recipes & Must-Know Mechanisms for New Players
A. Why You *Need* the "Weapon Recipe/Evolving Table" to Clear Runs Consistently
New players most often don't die from low damage—they die from picking up random weapons during early levels, then not having enough resources later to max out weapons to trigger evolutions. Recent community guides make it very clear: if you spread your investments too early, grabbing a little bit of every weapon, your weapons will never get maxed, and you'll miss the most important evolution windows. On the flip side, if you pick weapons and passive items strictly based on the evolving table, your power will jump up a full tier when you open chests around the 10-minute mark.
Plus, many weapons in Vampire Survivors are just "usable" in their base form—some even fall off hard in late game after being strong early on, like Garlic, which is a perfect example. But once you evolve Garlic into Soul Eater, its sustain and clear feel way better. Same with Holy Water; the base version is often inaccurate and clunky, but when evolved into La Borra, it plays totally differently. That's why real players don't start a run thinking "I wanna grab cool weapons"—they think "Which 3 to 4 evolutions am I gonna complete this run?"
B. How Evolving Works: Basic Rules: Weapon + Passive Item = Evolved Weapon / Ultra Weapon
Let's start with the most basic rules. In general, evolving a weapon needs two conditions: First, max out the corresponding weapon, usually to level 8. Second, have the matching passive item in your inventory. Once both conditions are met, open a qualifying chest and you'll have a chance to turn your base weapon into an evolved one. Recently published guides have summed this rule up clearly: Evolutions are usually a maxed weapon + matching passive + a chest.
But you have to remember two details. First, not all weapons follow the simple "1 weapon + 1 passive" pattern; some are combined weapons, like the Duo Birds, Duo Guns, Vento Sacro and Bloody Tear, or the Spellstring trio, which need two or even three weapons to combine. Second, not all DLC weapons only rely on a single passive; some also need maxed passives, stage relics, special map items, or even secret spells. That's why in mid-to-late game, you can't just memorize the base game's recipes—you have to know which DLC content has exceptions.
C. Who This Guide Applies To: New Players Starting Out, Returning Players, & Anyone Trying to Unlock All Ultra Weapons & Hidden Content
If you're a new player, the most important part of this guide is to help you avoid detours; if you're a returning player, the focus will be on how to re-organize evolving tables with so many DLCs now; if you're a completionist, later parts will specifically explain how to use the evolving table to plan one run to unlock multiple items, get achievements, unlock characters, and get hidden content. Because Vampire Survivors is no longer just the 30-minute base game—it's turned into a huge system-focused game. The official FAQ even describes Ode to Castlevania as a super-large DLC that's around 70% to 80% of the original base game's size, with over 40 weapons.
II. Overview of All Weapon Evolving Recipes
A. Text-Based Full Weapon Evolving Table: Base Weapons, Matching Passives, Evolved Names All In One Place
Here's the most practical base game common evolving table you should memorize first. These are classic recipes that will always be used whether you play PC, console, or mobile versions: Whip + Hollow Heart = Bloody Tear; Magic Wand + Tome = Holy Wand; Spear...
Knife + Bracers = Thousand Edge; Axe + Candlestick = Death Spiral; Cross + Four-Leaf Clover = Heaven Sword; Bible + Tome Binding = Unholy Vespers; Flame Wand + Spinach = Hellfire; Garlic + Heart Tomato = Soul Eater; Holy Water + Pull Orb = La Borra; Rune Tracker + Armor = NO FUTURE; Thunder Ring + Duplicator = Thunder Loop; Pentagram + Crown = Gorgeous Moon; Cat + Stone Mask = Vicious Hunger. These recipes—whether you figured 'em out yourself or got 'em from a wiki—are super reliable, and basically the first must-know basics all new players should memorize. So easy to pick up!
For the next level up, there are a few Combo/Special Evolution recipes you absolutely need to memorize: Max both Peachone and Ebony Wings to unlock Vandalier; Combine Phiera Der Tuphello, Eight The Sparrow, and Tiraju to make Phieraggi; Fuse Vento Sacro with the evolved Bloody Tear to get Fuwalafuwaloo; Collect SpellString, SpellStream, and SpellStrike to craft SpellStrom; Pair Laurel with the left and right half of the Red Cloak passive to make Crimson Shroud; Combine Clock Lancet with Gold Ring and Silver Ring to craft Infinite Corridor. These are what many players call the "ultra weapon feel" source, especially Crimson Shroud and Infinite Corridor—they're basically the go-to answers for boss fights and high-difficulty challenges, and you'll struggle so much without 'em.
As for DLC content, I suggest you keep track of them separately—don't try to cram everything in at once, it's way too easy to get confused! For example, in the Emergency Meeting DLC: Report! + Mini Crewmate = Emergency Meeting; Operation Guns adds 22 new weapons; Ode to Castlevania drops over 40 new weapons at once; Emerald Diorama adds 16 new weapons plus the "Glimmer" mechanic. That said, the DLC synergy chart is now way too big to fit on a single small image. The best approach is always: master the base game recipes first, then add notes for each DLC you buy.
B. Recommendations for Downloading/Saving Visual & Organized Synergy Charts
If you really need to check info while playing, I highly recommend saving two things. The first is the in-game Forbidden Grimoire—once you unlock it in the Library, you can view all known evolutions in the pause menu. This is the most accurate method and you won't get tricked by outdated charts—super reliable.
The second is community-made charts updated with new patches. Players from Taiwan and Hong Kong often use the "latest version synergy chart" thread on Bahamut Forum to check updated recipes, because community charts are way faster—especially right after a new DLC drops, they're way quicker than long-form guides. Just remember to get the new version regularly, don't use a 2024 chart for the 2026 DLC, it won't match at all!
C. Common Icons & Abbreviations in Synergy Charts
New players usually get stuck not on the recipes themselves, but on the icons. If you remember three basic things, you'll basically never get lost:
First, the left side is usually base weapons, and the right side is matching passives;
第
Third, some DLC conditions will clearly state "passive needs to be max level" or "map item only" — it's not that you missed something, it's just way more complicated by design. Like in *Vampire Survivors*
Take this popular roguelite survival game's "Emergency Meeting" evolution line as an example — some of its designs require specific passive mechanics to work properly. Also, the version 1.14.105 guide compiled by the Steam community has added extra stuff like hidden secret weapons and rare evolution paths like the Chaos Rune.
III. For Newbies: The Key Combinations You Should Memorize First
A. Must-Know Builds to Get Through Your First Run: Garlic, Santa Water, King Bible Lines, etc.
If you're new to this game, I highly recommend NOT cramming the entire evolution list right away — just memorize 3 or 4 most practical combinations to get you through the early game.
The first one is definitely the Santa Water line: Santa Water → La Borra. The reason is simple: once you get La Borra, you immediately feel like "okay, I can actually survive now" — it creates a constant damage zone around your character, and it's one of the core AOE damage weapons in the late game. A lot of new player guides these days also rank La Borra as the top beginner Build pick.
The second one is the King Bible line: King Bible → Unholy Vespers. What makes this line great isn't just its damage — it gives you a super reliable "safety net" feel. If you're still learning the early spawn patterns of enemy waves, this evolution weapon will cut down your mistakes a lot, making the game way more forgiving.
The third one is the Garlic line: Garlic → Soul Eater. I know a lot of veteran players complain that Garlic's damage slows down in the late game, but for new runs, it's totally solid. Especially when you're still practicing movement, identifying enemy types, and learning to control the field area, Garlic's ability to auto-clear nearby enemies without aiming is a huge lifesaver. Just remember, it's not a universal solution — mid to late game, pair it with other evolution weapons to tweak your whole Build for better results.
B. Example Clear Build That Only Uses One Evolution Chart
If I had to pick one beginner Build that you can just copy-paste to make your runs way more stable, it's this set:
La Borra + Unholy Vespers + Thunder Loop, for passive skills prioritize "attractor", "Spellbinder", "Duplicator", and fill the remaining slots with "Empty Tome", "Spinach", "Candelabrador", or "Armor". A lot of recent player-made newbie guides combine these three weapons into an "auto AOE clear + survival" Build, and for good reason: they all auto-lock, have huge range damage, consistent clear speed, so you only need to focus on moving away from fatal hits — almost no extra actions required.
If you want to go a step further, you can also add Runetracer and follow the NO FUTURE evolution path — it's super smooth to play. Runetracer already has decent damage on its own, but evolved, it gives you that awesome feeling of "I barely do anything, but the screen is clearing enemies all by itself". For new players still getting used to the game's maps and time progression, this weapon is perfect.
C. Early-Run Mindset: What to Swap When You Don't Get Key Passives/Weapons
I can't stress this enough — a lot of new players fail not because they don't understand the evolution chart, but because they cling too hard to their planned path.
Like, when 8 minutes into the game, you still haven't gotten the "attractor" passive, but you keep forcing yourself to gather materials for La Borra? Or when your passive slots are almost full, you still refuse to switch to another evolution path and waste the chance?
The core idea for good players is actually pretty simple:
Aim for evolution weapons, but always keep flexibility to switch paths.
Didn't get the attractor? Look for the "Spellbinder" to go the King Bible line; no Spellbinder? Go for "Duplicator" to pick the Thunder Loop path; if nothing's showing up, level up your existing weapons as fast as possible — never sacrifice progress just to chase that perfect
Choosing the wrong optimal build can totally waste an entire run. This kind of on-the-spot adaptability—adjusting your direction in real time—actually matters way more than memorizing fusion recipes by heart.
IV. Must-Haves for Advanced Players: Full Details on Evolved Weapons & Ultra Weapons
A. The Effects, Pros, Cons, & Best Maps for Every Evolved Weapon
An evolved weapon isn’t automatically a god-tier item just because it’s evolved—each one has its own specific role. La Borra is perfect for maps with high monster density, flat terrain, and if you want to play it safe and push steadily forward, like the Library. Unholy Vespers is a classic defense core, and it works great on maps where pressure builds gradually, like the Library or Dairy Plant. Thunder Loop has strong area-clear power, but it’s geared more for handling dense mobs rather than keeping you safe up close. NO FUTURE deals insane damage in areas with lots of walls where your attacks can bounce around. Hellfire is your standard piercing, brute-force damage dealer. Holy Wand is reliable for close-range threats, but its growth isn’t as crazy as La Borra’s. These differences are really clear when you check each weapon’s detailed stats.
It’s super obvious once you’ve put in lots of playtime.
So when you look at the fusion table, don’t just fixate on whether you can make something—think about whether it fits the map you’re on right now. For maps like Mad Forest, which opens early but gets way more monster-heavy as you progress, La Borra and Vespers are solid picks. Then when you hit the Dairy Plant—way more chaotic, way more mobs spawning—you’ll want your evolved weapon to handle both crowd control and survival. That’s why I always say the fusion table isn’t the end-all-be-all—it’s just a starting point for building your loadout.
B. Ultra Weapon Unlock Requirements & Extra Notes
The “Ultra Weapons” players talk about usually fall into a few categories:
First, Combination Weapons like Vandalier, Phieraggi, Fuwalafuwaloo, and SpellStrom;
Second, High-Condition Special Evolved Weapons like Crimson Shroud and Infinite Corridor;
And then there are those from DLC that need special conditions, maxed passives, or even secret unlocks. If you check the Evolution page on Fandom or the Steam 1.14.105 version guide, you’ll see that evolved weapon requirements for later DLC are way more complex than the base game.
The biggest pitfall here is only remembering the fusion recipe and missing the prerequisites.
For example, Crimson Shroud and Infinite Corridor aren’t just simple “weapon + passive” fusions—some DLC weapons even need their passives to be maxed out. So when you’re working on completing your encyclopedia later, definitely split “evolution requirements” and “weapon effects” apart. It’s so frustrating to follow the table exactly and still can’t make it work!
C. Details Missing from the Fusion Table: Synergies with Curse, Cooldown, & Range Bonuses
Once you’re playing late game, you’ll notice the fusion table only tells you “how to make it”—not what works best with that weapon.
Like La Borra really benefits from increased duration, range, and overall monster density; Unholy Vespers has clear ties to cooldown and duration; Runetracer is the classic example of something that works with almost all general stats; and some high-projectile weapons have totally different performance based on bullet count, speed, and range. A recent player guide even straight-up says: Runetracer is so strong because it gets almost all general stat boosts.
So when you’re messing with late-game stuff like Curse, Limit Breaks, or Tarot Cards, the fusion table is just a ticket to get in. What actually pushes your build to the limit is knowing exactly what stat boosts that weapon needs.
V. Passive Items & Fusion Priorities
A. List of “Key Passives” That Affect the Most Fusions
If I had to pick the top passives new players should prioritize, I’d name these right away:
Empty Tome, Duplicator, Attractorb, Bindings, Spinach, Candelabra, & Bracelet
The reason is simple: these aren’t just for evolving specific weapons—they’re all-around god-tier passives. For example, Empty Tome doesn’t just help Holy Wand, it also makes the playstyle of tons of other weapons way better; Duplicator works great for large...
The boost for bullet-spamming builds is insane; the Attractor Orb not only helps you craft La Borra, but it also improves your XP farming rhythm; the Banisher and Candleholder are often great multipliers for core AoE weapons.
B. Upgrade Priorities From the Synthesis Table: Which Passives to Unlock First for Maximum Gain
The most practical upgrade strategy for new players isn’t just about “maxing passives first or weapons first” — it depends on which evolved weapon you plan to make this run.
If you’re dead set on making La Borra, you can grab the Attractor Orb early, but the Holy Water itself is usually worth prioritizing more;
If you’re going for the Vespers route, plan both the Bible and Banisher together;
If it’s a steady run focused on AoE, the Clone and Blank Book offer huge overall gains.
The principle mentioned in recent player guides is spot on: Arrange your passive slots around the evolved weapon you want to make first. Don’t wait until all passive slots are full, only to realize you left no room for your target weapon’s synthesis.
C. When You Run Out of Slots: How to Figure Out Which Passives to Ditch Using the Synthesis Table
This is where the Synthesis Table really shines for advanced play.
It’s not about copying the recipe word for word — it’s about knowing which plans to pause when only two passive slots are left.
The rule is simple:
If a passive only helps a weapon you don’t actually plan to make, it’s way easier to ditch than a universal passive.
For example, if you originally planned to go down the Garlic route, but later in the run your main focus is Holy Water, Bible, and Lightning Ring, the Red Heart Tomato becomes less important. Conversely, if your entire build is focused around AoE, then the Attractor
things like the Attractor Orb, Banisher, and Clone — don’t ever throw these away. The key players who can turn a run around never grab the most evolved items; they grab the evolutions that fit their run best.
VI. Map, Mode, and Synthesis Strategy Differences
A. Best Synthesis Recipes for Each Map
If a new player asks me which map to start with to practice synthesis skills, I will definitely recommend this: Great Library Ceaseless. Recent new player guides also point out that while Mad Forest is the game’s first default open map, Great Library Ceaseless has a much steadier, smoother pace, plus free map items on both sides. Even if all passive slots are full, you can still pick up extra passives — it has way higher error tolerance, perfect for new players getting used to the synthesis system.
Maps like Great Library Ceaseless are linear with simple terrain — weapons like Bible, Holy Water, Lightning Ring, and Wands work really well here. But switch to a map with chaotic pacing and massive monster spawn pressure like Dairy Plant, items like La Borra and Vespers that guard your space are way more useful. For maps with walls, narrow paths, or where you need to move a lot, weapons with bounce or piercing effects fit better. These aren’t hard rules, but after playing a lot, you’ll realize: The map’s traits definitely affect how good many evolved items are.
B. How to Use the Synthesis Table to Adjust Builds in Adventure Mode, High Curse, and Infinite Mode
Since 2023, the developers have added Adventure Mode to Vampire Survivors, plus lots of free updates and big DLCs. Now, the game has way more than just the standard Normal Mode to play. The official FAQ also clarifies that Adventure Mode is available on all major platforms now, with more content like the Emerald Diorama and online co-op added later.
In High Curse Mode or long-run challenge modes, the focus when using the Synthesis Table shifts to: First secure your survival, then chase damage numbers.
For a standard run that clears in 30 minutes, you can lean into damage gear more;
But in High Curse Mode, you need things like Vespers, La Borra, Crimson Shroud that keep your fight steady;
For Infinite Mode or extreme builds, you can start thinking about which evolved items work with Tarot Cards and Limit Breaks, stacking up boosts over time.
C. Synthesis Combos and Practical Examples for Death Fights / Hard Challenges
Anyone who’s fought the Red Death knows: the evolved items that work in normal runs are totally different from those that actually help in Death fights.
The core items people actually use for these hard challenges are mostly Infinite Corridor and Crimson Shroud. The former cuts enemy health effectively, the latter greatly boost
These two are basically mandatory picks for surviving damage in the Death fight!
If you’re just here to clear normal stages, you don’t need to stress too much about them early on. But if you’re gunning for high-difficulty challenges, hidden kills, or survival records, you’ll need to master this combo sooner or later.
VII. Crafting Guide & Unlocks: Characters, Hidden Items, and Achievements
A. Connections Between Certain Crafted Weapons/Super Weapons and Character/Achievement Unlocks
In Vampire Survivors, most unlocks are actually linked to each other.
You’re not just crafting items to evolve your gear—many character, relic, and achievement unlock requirements also ask you to make specific weapons, survive for certain periods, or complete tasks on specific maps. Recent newbie guides even advise using the Unlocks menu as your real main progress tracker, since it clearly shows you exactly what new content each goal is opening up for you.
I highly recommend pairing the crafting guide with the unlock list. You’ll go from feeling like you’re wandering aimlessly to having a clear plan for everything you want to do.
B. Planning "Multiple Unlocks in One Run" Routes with the Crafting Guide
This is a must-learn strategy for completionists.
For example, if you want to unlock a character, grab all the map relics, and craft a specific evolved weapon all in one go, you can plan out your six weapon slots and six passive item slots before starting the run. Recent guides mention that the free map item in the Libraries is perfect for this kind of multi-goal planning—it lets you grab extra items even after your passive slots are full.
The truly efficient way to play is never to say "I’ll do a casual run first, then a separate run just for unlocks"—it’s all about knocking out three goals in the same run.
C. How the Crafting Guide Updates and Expands After New DLC Weapons and Passives Are Added
This has become super important by 2026.
Between 2024 and 2025, the devs dropped new content packs like Operation Guns, Ode to Castlevania, and Emerald Diorama, plus more like the Ante Chamber in October 2025. As a result, the crafting guide has gotten longer and longer. Even in 2026, the official website’s homepage news feed is still getting updates with info on all the new content being released.
The habit you should build is definitely not hunting for "one crafting chart that never goes out of style"—it’s figuring out the rules for yourself:
First, memorize the core crafting logic of the base game.
If you buy the DLC, prioritize finishing the evolved item sets for that content.
After every major update, check the official FAQ and the new crafting charts compiled by the community.
VIII. Common Newbie Mistakes and Bad Crafting Combos
A. Most Common Newbie Mistake: Only Following Crafting Guides, Ignoring Map and Build Needs
The first trap newbies fall into is copying crafting guides word-for-word without thinking if the combo fits the map.
Like, if you’re on a cramped map with super fast spawning enemies, don’t force a combo that takes forever to get started in the early game and has weak damage.
Or if you’re already running out of space to survive, don’t blindly grab an evolved item that’s all about damage. The crafting guide is a reference—not something that tells you exactly what to do.
B. Classic Reasons You Can’t Craft What the Guide Says
There are three common reasons you can’t craft something, even though the guide says you should:
1. Your weapon isn’t max level.
2. You picked the wrong passive items or didn’t get them at all.
3. You haven’t met the chest trigger requirements, or if it’s a combined weapon, you’re missing the other item needed for it. The devs clarified the rules later on: most evolved items need a max-level weapon + the correct passive, then open a chest to trigger the craft. One really easy-to-miss issue is slots being misplanned—you meant to fit three evolved weapons, but your passive slots are full of unrelated items, so you end up staring at the guide frustrated. This isn’t about being bad at the game—it’s about picking the wrong direction at the start of the run.
C. Not Recommended Newbie Crafting Combos and "Overly Greedy" Weapon Slot Builds
For newbies, the last thing I’d advise is not to go for a specific weapon—it’s being greedy for combined weapons, high-difficulty conditions, and trying to evolve all six weapons in one go right from the start.
Combos like Twin Birds, Twin Guns, or Three Staffs look super strong, but they demand really tight early-game planning and medium-game survival flexibility. If you’re still figuring out basic movement and upgrade timings, start with a stable build instead—it’s way easier. The real newbie mistake isn’t "picking the wrong weapon"—it’s being so greedy that your whole build has no safety net at all.
IX. Useful Tools & Resources: Where to Find the Latest Crafting Guide
A. Common Crafting Guide Tools for Players in Taiwan & Hong Kong: Websites, Image Collections, Community Cheat Sheets
The go-to tools for players in Taiwan and Hong Kong are pretty consistent:
The in-game In Grimoire;
The Evolution Page on the Vampire Survivors Wiki;
and The latest crafting guide thread on Bahamut. Combining these three will cover almost all content in most versions.
B. How to Quickly Confirm if the Crafting Guide is Updated for New Versions/DLCs
The safest method is always to first check Poncle’s official website FAQ/news. The devs will tell you exactly how many new weapons were added in this update, whether it’s free content or a collaborative DLC, and if it’s synced across all platforms. Then you can check the Wiki or community charts to fill in the recipe details. For example, the official FAQ for Ode to Castlevania directly states that over 40 new weapons were added; the FAQ for Emerald Diorama mentions 16 new weapons and new mechanics. Knowing this kind of info first will prevent you from underestimating the update’s scale.
C. Recommended Chinese Live Stream/Tutorial Channels: Demonstrating How to Use Crafting Guides to Plan Builds
If you prefer video tutorials, countless Taiwanese players on YouTube have made plenty of visual guides and gameplay demos. You can find traditional Chinese-speaking creators’ full weapon crafting guides, beginner visual combo sheets, and DLC weapon evolution info right in search results. The best part of these videos isn’t making you memorize charts by heart, but letting you directly see "how this build works in actual combat".
X. Crafting Guide Usage Tips Tailored to Player Types
A. Beginner-Friendly Route: Master Only 3-4 Must-Learn Combos to Sustain to 30 Minutes Easily
Beginners really don’t need to memorize every single crafting guide. Just first master these four:
La Borra, Unholy Vespers, Thunder Loop, NO FUTURE.
These four combos are already enough for you to play through most of the early game content smoothly. Add Garlic or Wand as transition items, and your stability to make it to 30 minutes will be much higher.
B. Achievement/Completionists: Use Crafting Guides to Plan "Multi-Goal" Efficient Runs
The core for completionists is "planning".
Before starting a run, figure out which character, map, weapon, and relic you want to unlock in this game first, then use the crafting guide to help you reach your goals—don’t just mess around as you play. This way you’ll find that the seemingly endless unlock list can actually handle several things at the same time.
Numbers Fans & Meta-Chasers: Use Crafting Guides, Limit Breaks, Curse Effects & Tarot Cards to Build Top-Tier Builds
Once you’ve played the game to the late game, you’ll definitely step into this phase:
You’ve already memorized the crafting guide inside out, so now the most fun is no longer following recipes, but testing which weapon, with stacked high Curse, Tarot Card effects and Limit Break multipliers, can deal the most ridiculous damage. At this point, the crafting guide is no longer just a reference for checking recipes, but has become your core map for numerical experiments. Weapons like Runetracer, La Borra, specific synergy weapons, and special weapons that need to meet conditions to evolve will perform totally differently in these extreme builds compared to beginner runs.
XI. FAQ: Common Questions About Vampire Survivors Crafting Guides
A. Can’t Weapons Not Marked on the Crafting Guide Evolve?
Not necessarily.
Some weapons are naturally do not have an evolved form, while others can only be evolved through combination matches, meeting specific conditions, using stage items, secret unlocks, or DLC-exclusive methods. The weapons section of the Fandom game page also clearly states that not all weapons can be evolved.
B. Why Can’t I Combine an Evolved Weapon or Super Weapon Even When Following the Crafting Guide?
The most common reasons are as follows: the weapon hasn’t reached max level yet, you picked the wrong passive item, the timing of opening the chest is wrong, or you’re combining weapons that need synergy as if they were regular evolution combinations. Check these four parts first, and you’ll usually find the problem.
C. How to Quickly Fill in the Latest Crafting Guide When a New DLC is Released?
You can first check the official FAQ to confirm the new DLC’s name, corresponding platform and content;
then refer to the game wiki or updated charts shared by the player community.
Don’t only rely on the old crafting guide! There are many types of DLCs now, and the scale of different collaborative DLCs varies greatly, so the old chart is likely not keeping up with the new content.
D. Are There Differences in Fusion Content Between Mobile/Console Versions and PC Version?
If you're playing the standard edition of *Vampire Survivors*, the core evolution content is pretty much the same across all major platforms. The official has been rolling out DLC to Steam, Xbox, PlayStation, Switch, Android, iOS and other platforms gradually; titles like *Ode to Castlevania* and the free *Emerald Diorama* are clearly multi-platform releases. The key thing to note is that Vampire Survivors+ is a separate version, with separate saves from other editions, and licensed collaboration DLC won't be added to Arcade mode. Also, the official online mode won't be available on mobile at launch.
Don't treat the fusion table as a rigid, follow-it-every-word dictionary—see it more like a battle plan to prep before your run starts.
When you start playing *Vampire Survivors* with this mindset, you'll realize the real fun of the game isn't just lasting 30 minutes; it's about building your own auto-clearing "monster machine" every single round, and that sense of achievement is the absolute best part.